An epoxy is an option worth considering if you want to be certain that you get the most out of the job that you have coming up in the near future. Epoxy is one of the materials used today that is considered to be among the most lasting because of its resistance to both heat and moisture. But on the other hand, if you do not add any color to the epoxy, the end result will be a color that you might not like as much as the original.
Epoxy resin is frequently used by artists, craftspeople, and those who perform their own home improvement projects because it is an excellent medium for coloring. Epoxy resin is typically translucent to transparent to perfectly clear, and this quality is desirable for particular purposes, such as casting in items. For example: However, coloring the liquid can be helpful or desirable in a variety of other contexts and situations.
It appears that resin has experienced a meteoric rise in popularity over the past few years, as people of all ages and walks of life are attempting their hand at this remarkable art form. The resin may be fashioned into a wide variety of fascinating items, ranging from but not limited to jewelry, coasters, cutting boards, forms, letters, and even containers, by creative individuals. Because the resin is normally transparent, the decision to tint it is ultimately up to the user; nonetheless, coloring epoxy resin presents a unique challenge. Let's have a look at some of the items you may use to color the epoxy resin, as well as how those things function.
What Can You Use for Colouring Epoxy Resin?
As was noted before, epoxy resin normally hardens into a completely transparent state. Because of this, you will need to manually add a colorant, preferably when combining the epoxy and the hardener. However, what kinds of chemicals can be used to color the resin? If you want to add some color to your epoxy resin, some options for doing so include eyeshadow, alcohol ink, mic powder, food coloring, acrylic paint, resin dye, and even food coloring. The following provides a more detailed look at each of these coloring agents as well as an explanation of how they function to impart color to your epoxy resin.
Using Resin Dye
It is well knowledge that using resin dye or epoxy dye to add color to your resin castings is the method that adheres to the strictest technical standards. Although they can be a bit pricey, it is a quick and efficient method to add some color to your resin-making without much work and can be found in most craft shops or online if your local store doesn't sell it. You can find it in most craft stores or online if your local store doesn't stock it.
The overall color effect of resin dye is an opaque color aesthetic that still very much enables some light to flow through liquid resin and cured casts. This is despite the fact that the overall color effect is opaque. Epoxy dye gives resin casts the appearance of stained glass, but without the difficulties associated with using stained glass, such as glare and magnification. Having said that, resin dye is a great option to consider using if you want a color that is close to being solid but not quite there.
Using Mica Powder
Mica powder is another type of dying agent that many both novice and experienced resin artists consider to be the best way to color resin. Stone flakes are broken down into a powder to create the powdery substance known as mica.
Because the stones that are used to make these powders are frequently colored and sparkly, the powders that are produced from them also take on the same qualities. Mica powder can be thought of as a sort of glitter that lacks the reflective qualities of glitter, and similar to glitter, it has the ability to disperse its color effectively when it comes into direct contact with epoxy matrix.
Mica powder gives a finish that is rather opaque and does not let light flow through it. Mica finishes are often used in jewelry. If you want to make solid resin forms or letters with an excellent color finish, this is an excellent option for you to consider. Mica powder has a reputation for being relatively inexpensive, which means that you can restock on a wide variety of colors in case you find yourself in a situation in which you need to dye epoxy resin or any of the other many substances and surfaces that mica powder is able of dying. The greatest part about Mica powder is the sheer variety of colors you get if you choose to use it, and the best part is Mica powder also tends to be cheap.
Using Glitter
You can use glitter for a lot more than just the occasional birthday card or a party decoration; in fact, if the creative spirit strikes you, you could use it to color your resin castings. Sparkle can be used for a lot of different things.
Glitter does not contribute color in the traditional sense; nevertheless, if you use enough of it, it can give some color to the resin workpieces you create, and it does so for a fraction of the cost of the majority of the coloring methods we have discussed up until this point.
It is vitally crucial to give careful consideration to the type of glitter that you will use, as the heavier flakes will fall to the bottom of the container.
The finer the glitter dust, the longer it will be suspended within the resin. This allows you to stir it into the resin to ensure that the color is distributed evenly.
You can get more than one color out of a single piece of work if you use glitter, mix multiple colors of glitter dust together, then add it to your epoxy either before or during the audition process to get what is certainly going to be a fantastic look.
Adding color to epoxy in this manner can result in less of a mess, and it also gives you the opportunity to employ glitter that would otherwise be confined to the back of your supply drawer for the foreseeable future.
Using Alcohol-Based Ink Dye
Due to the high concentration of these inks, using alcohol-based ink to color resin can be quite effective, but it is not usually a method that is appropriate for beginners to use.
When compared to other dye agents, alcohol-based inks have a high level of pigmentation and offer excellent value for the money spent.
However, if this is your first time working with them, you may find that they are difficult to manage because you cannot simply add them to the hardener and resin as they are being mixed.
It is best to incorporate the alcohol ink into the curing process of the resin so that it does not interfere with the early chemical reaction that occurs between the resin and the hardener.
The best time to add your alcohol ink is after you have already put your resin into your mold or tabletop. This will allow it to color your resin without compromising the curing period or the process of bonding.
There are various dyes that can be used to color resin, but alcohol-based ink is by far among the most effective methods to do so. It provides quite a vivid color palette while only requiring a very small amount to accomplish this goal. Other dyes can be used to color resin.
Using Eyeshadow Dye
When compared to other polymer composite materials, coloring resin is a comparatively simple process. This is especially true when using acid dyes.
Because it is so simple, you could even use some eye shadow that you no longer use to color your resin if you wanted to. Surprised? We don't blame you, and seasoned resin painters are extremely familiar with this approach because of how closely the color tone resembles the result of combining mica powder with resin. This is an excellent workaround to know in case of an emergency, and it also gives you a reason to purchase some really beautiful eyeshadow colors and store them around.
They get the task done and can even be for use in combo with other colorants should the need occur. The effect won't be as intense as it would be if you used mica powder instead of them, but they still get the job done.
Using Acrylic Paint
If you are an artist who is experimenting with resin for the first time, you probably already have some acrylic paint lying around your studio. If this describes you, read on.
The fact that acrylic paint is among the few forms of paint that are graded for use with resin due to the fact that the base components are compatible is excellent news. However, we feel it is important to point out that if you are seeking to make your resin "pop" with color, the intensity of color that acrylic paint produces may not meet your expectations.
Even while this is contingent on the grade of acrylic you are using, it is generally true that higher-quality paints yield more bright colors than cheaper paints, despite the fact that the former may cost more. When it comes to coloring your resin castings, one of the wonderful things about the use of acrylic paint is that there is a broad variety of colors and brands to pick from. This ensures that you will always have a color and finish that is appropriate for the situation at hand.
The Steps In Colouring Epoxy Resin: Using Paint, Ink, Or Tint
The use of tint, paint, or ink is the primary component of the first strategy for coloring epoxy resin. To get the desired shade of color for your finished epoxy resin project, you can use a wide variety of different kinds of paint and ink. If you want to make your dreams come true, all it should take is a quick trip to the grocery shop to show you the huge array of possibilities that are available to you. Do not be afraid to investigate your possibilities for ink as well.
It is not highly suggested that you start ripping open printer cartridges from the printer and trying to dump the items of the cartridges into the combination; however, you can test with a few different types of epoxy in order to find the color scheme that you necessitate. Although it is not advised that you begin tearing open ink cartridges from the printer, it is possible to do so. At the same time, you need to be attentive, making sure that you choose the proper color combination carefully, and trying to ensure that you pick the right color combination. It is important to keep in mind that the final result may have a slightly different appearance once everything is said and done. The following procedures are included in the steps of this method:
Gather The Materials
The first thing you need to do is go out and get all of the components that will be used to color the resin. When you go to the shop, you need to look for paint or tint which has been developed especially for coloring resin. You can get these at most craft stores. Despite the fact that there is a plethora of choices, the majority of these possibilities are not going to be created with the intention of coloring resin.
Find a paint or tint that is specifically formulated to form a bond with epoxy if you want the greatest results; otherwise, you won't be able to use it.
This will allow you to highlight the intense colors that appear best with your coat paintings, including some that glow in the dark. If you want to add a little bit about something new to the room, this might be a wonderful method to boost the quality of the product that you end up with at the end of the process. Utilize everything that adhesive resin has to give your project so that you may get the most out of it.
You are able to get an artificial dye that has been developed to precisely connect with epoxy, and this is something you may do. Take for instance the possibility of employing a product known as ResinTint. You should go to a local crafts store if you have any queries or worries about the particular type of dye that you are intended to purchase and ask for guidance from the employees there. They ought should be able to provide assistance to you in a reasonably simple manner.
Mix the Resin Together
It is time to mix your adhesives if you haven't done so already. If you haven't already. It is necessary to combine the epoxy resin with a component known as a hardening agent before coloring it with any other pigments. Take a look at the instructions on the resin container if you are uncertain how to proceed with this. Determine the exact proportions that must be used in order to manufacture the desired resin. Wearing rubber goggles and gloves is a good idea if you want to keep your skin and eyes safe while you are working with the resin. After you have combined the components of the resin, the next step is to determine how you might achieve the most desirable shade for the epoxy resin you are using.
Pour Some of Your Resin Into A Mixing Cup
During this stage of the process, you should be sure to maintain all of your protective gear on at all times. Take one ounce by volume of the resin you just finished mixing together. It should be poured into a mixing cup. Before you add all of your dyes and pigments to the whole of the resin, you need to be certain that you are following the instructions for the correct ratio and that you are using it. Consequently, get this teeny-tiny measuring cup, and add a trace amount of your coloring agent to the contents of the cup. Determine the precise amount of coloring agent that must be added in order to achieve the desired level of quality in the end product. For instance, while working with cough syrup, you might find it helpful to use a measuring cup. Because of this, you won't have any trouble determining the appropriate proportion of coloring agent to resin that you'll need to get the desired result.
Add Colour To The Resin
Go ahead and add the color to the balance of the resin now that you have a great sense of how much of it you need to put into the resin, and then proceed to use the resin. Combine the ingredients by stirring them together with a toothpick or another similar-sized stick. To achieve the best possible results, you should continue to add color until it reaches a concentration of between 2 and 6 percent of the overall weight of the combination.
Utilize a digital scale in the event that you require assistance with determining this. In this manner, you will be able to exactly weigh the color as well as the mixture itself.
It would be in your best interest to make every effort possible to avoid exceeding six percent of the total mass of the combination if at all possible. If you add an excessive amount of color to the mixture, you run the risk of causing a disruption in the chemical reaction that is responsible for the longevity of the resin.
On the other hand, the outcome might not be to your liking if you end up adding insufficient amounts of color. Therefore, when coloring the resin for the first time, you should err on the side of applying too little color. You always can add more color at a later time, but you cannot remove it once it has been added.
Stir The Mixture For A Minute
After you have added the necessary amount of color, give the mixture a toss for around a minute. Do you wish to whisk the ingredients together until there are no more bubbles in the mixture? In this manner, you will be able to verify that the pigment has been well combined with the resin. In addition to that, the new color will be distributed uniformly throughout the mixture.
If you apply the resin while there are still air bubbles in the mixture, you will not end up with a smooth finish. Therefore, exercise patience and thoroughly whisk the ingredients together. When there are no more visible bubbles in the combination, you should consider the process complete, and the color should be distributed uniformly throughout.
Repeat The Process Until You Have The Desired Colour
As you combine the two components and stir them together, you could observe that the color becomes a shade or two lighter as the remaining pigment is distributed throughout the resin. As a result, you might require the addition of additional color in order to get the required appearance.
If this is the case, then they need to go back to the procedures that were listed above and keep adding color to the resin. It goes without saying that you should not add more than six percent of the entire weight of the combination; however, if you began with two percent, it is possible that you will need to increase it. After you have accomplished the look you want, you should really be able to apply the resin, which will result in the formation of a durable epoxy surface.
You Can Also Create Resin Colouring With Household Items, Like Alcohol Ink
Even while it could be simpler to make resin coloring by using paint, ink, or tint, you can still get the same effects by making use of common household objects. The following is a list of the actions that you'll be required to follow:
Start By Mixing The Clear Epoxy Resin Thoroughly
In a manner analogous to the preceding procedure, you need to begin by completely combining your clear epoxy resin. Before continuing, you will need to finish the process of mixing your resin with a hardening agent if you haven't previously done so. This step is required in order to proceed. Take a glance at the container to determine the correct proportion of hardener to resin to use. As you start to combine the resin, it is imperative that you take all precautions to safeguard your face and eyes. Use safety goggles and protective gloves.
Pour The Resin Into A Smaller Container
Next, in a step that is quite similar to the one that came before it, you will need to transfer some of the resin into a more compact container. To guarantee that you are satisfied with the end product, you need to ensure that you add the coloring agent to a different mixing container. Make sure the cup you're using has the appropriate measurement marks on the side of it. In this method, you will be able to calculate the appropriate proportions of your resin and coloring agent when you mix them together later. For this step, you can once again use the tiny cup that comes with the cough syrup package.
Consider Reaching For Powdered Pigments, Like Mica Powder
Consider looking at the items you have lying around the house, such as pigment in powder form. For instance, you might have chalk, herbs, and spices in your collection. Even though this might appear a little bit strange, they will do an excellent job of mixing your resin with a coloring agent in order to make flow art. This is despite the fact that this might look a little bit unique. After the process of mixing is complete, the final product may have a gritty appearance. In spite of the fact that you might not include this in every scenario, there is a possibility that doing so could improve the quality of the final result. If you want your finished product to have a smooth appearance, you should avoid using powdered pigments as much as possible. Paprika is one of the seasonings that people use at this phase more frequently than any other spice. You can also try your hand at experimenting with a number of other granular spices that you might already have in your kitchen.
You Can Also Use Liquid Pigments, Like Alcohol Inks
You may also employ fluid agents to achieve a finish that is more uniform if that is what you are going for. It's possible, for instance, that you'll want to grab some watercolor paint or home dyes, as kids frequently use those. You won't have any trouble incorporating these into the color pigments of your colored resin. Because of these agents, the color resin you're working with will have a considerably smoother finish. In addition to this, even novices can do the mixing process with relative ease. You might want to think about using these liquid substances if you are attempting to do this on your own. You can also use nail polish or alcohol ink as an alternative to watercolor paint if you don't have any on hand. To reiterate, there is an abundance of liquid chemicals at your disposal that you can utilize to create a smooth finish once the process has been completed.
Complete The Mixing Process
After you have determined the appropriate proportions and selected the appropriate container, you can then proceed to mix your coloring agent with the remaining portion of the colored epoxy resin in a manner analogous to the phase that came before it. Put a cap on the mixing ratio, keeping it at less than six percent of the total weight of the combination.
Keep in mind that if you use an excessive amount of coloring agent, you can end up disturbing the settling process of the colored epoxy resin, which in turn would reduce its longevity. After you have included the coloring ingredient, give the mixture a good stir for about a minute, or until there are no air bubbles left in the mixture.
Add More Colouring Agent If Necessary
After this, you will be able to determine whether or not more mixing agents are required. When you are attempting to combine these agents, it is best to err on the side of caution by putting closer to two percent than six percent because then you can always add additional coloring agents if you need to. On the contrary, if you add an excessive amount of the coloring ingredient, there is no way to remove it. As soon as you decide that the end result meets your expectations, you can move forward with the project.
Which Colours And Pigments Are Suitable For Resin?
There is a wide variety of color media available on the market. On the other hand, not every single one of them can be used to color resin. The mixing ratio shifts, and either the mass does not firm as expected or dull areas form, and this is especially true when the inks contain water as an ingredient. Another essential quality is how resistant the material is to light.
Colour Pigments For Epoxy Resin
Resin can be colored in a risk-free manner by using color pigments. When you utilize pigments of high quality, you just need to apply a very small amount. However, color components in powder form do not disperse entirely, which results in a fascinating optical illusion that is slightly grainy. In this comparison, we have outlined the best goods as follows:
Liquid Colour Concentrate
The liquid color concentrate may be simply combined with the resin, and it dissolves entirely to provide a color that is uniformly consistent. We have also provided a summary of the goods in this comparison that have the most evidence supporting them.
Things To Consider
When it comes to using colors, it doesn't matter what brand of epoxy you use. Epoxy companies that market their product as drying clear are the ideal options for the job, as the epoxy tint will be closer to its original color after drying. Because epoxy has a propensity to dry with a yellowish cast, it is essential to keep in mind that the hues may change slightly after being mixed in; otherwise, you could wind up with an unpleasant surprise. To begin, it is recommended that you begin the process of coloring the epoxy in a plastic tub (e.g. a tiny, disposable travel box, a one-ounce blending container, etc.). This will ensure that you are pleased with the color that is generated and that there will be no unpleasant surprises when you are mixing a larger size batch. It should only take a modest amount of your color to cover the majority of the pigment in these little containers.
Summary
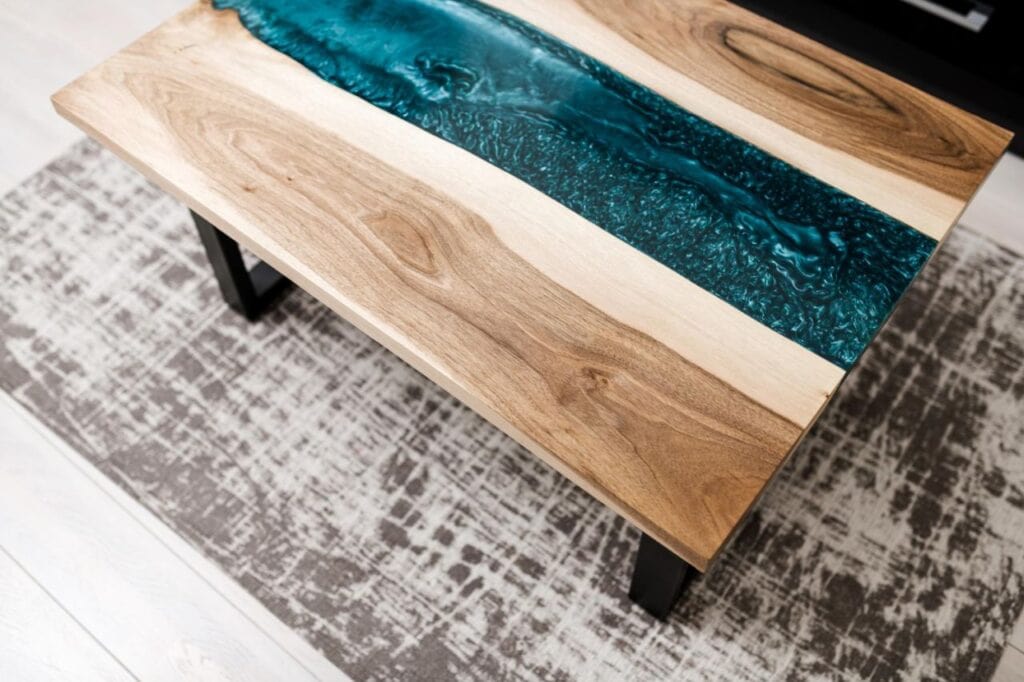
There is a good chance that while you were browsing the internet in quest of a new project, you came across some breathtaking waterfall tables, luminescent bar tops, and worktops that appear exactly like galaxies. However, what appears to be a complicated technique is actually a popular do-it-yourself method that uses colored epoxy resin. Many of these goods can be sold for over $12,000, despite the fact that the method looks complicated.
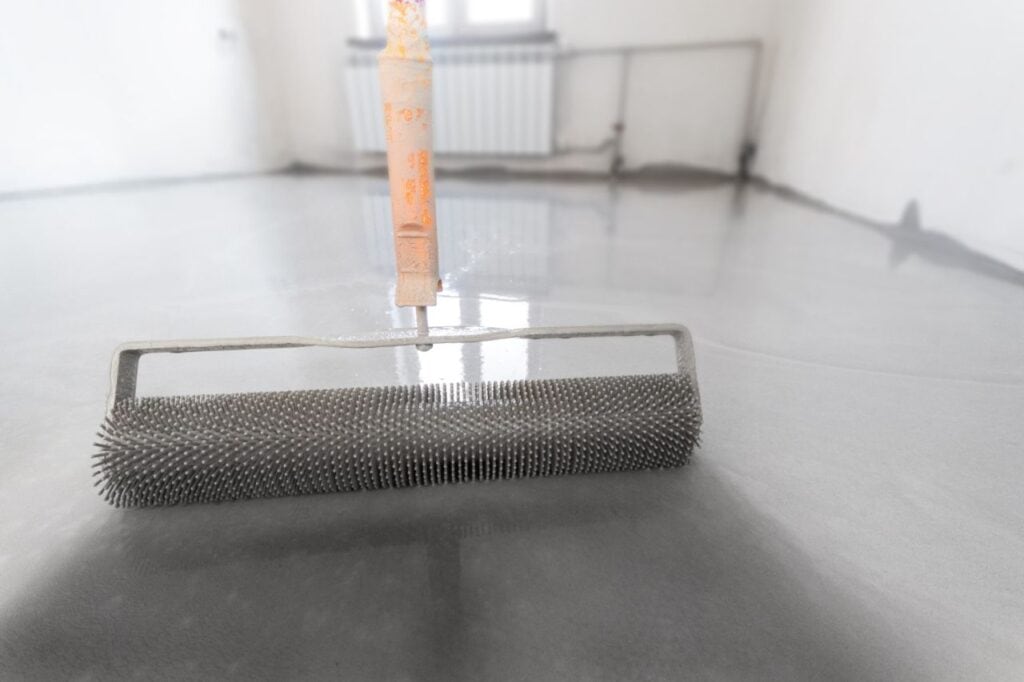
Typically, epoxy flooring lasts 2 to 3 years in heavy traffic. Commercial properties—like garages, restaurants, or factory spaces—with lots of daily foot traffic can expect this experience. However, with proper care and maintenance, your epoxy flooring may last much longer.
- Strong Application Fumes. During the epoxy application process, wet epoxy gives off an unpleasant smell. ...
- Long Curing Time. ...
- Slippery When Wet. ...
- Economical Flooring Choice. ...
- Resistant to Damage. ...
- Weather-withstanding. ...
- Aesthetically Pleasing. ...
- Protects and Decreases Wear & Tear.
Extremely safe – Epoxy is a very safe coating for your hard floors. It's slip resistant, shock resistant, and less abrasive than concrete and other types of industrial flooring. ... It can also withstand heat of up to 200 degrees, making it a better choice than most other types of flooring when it comes to fire resistance.