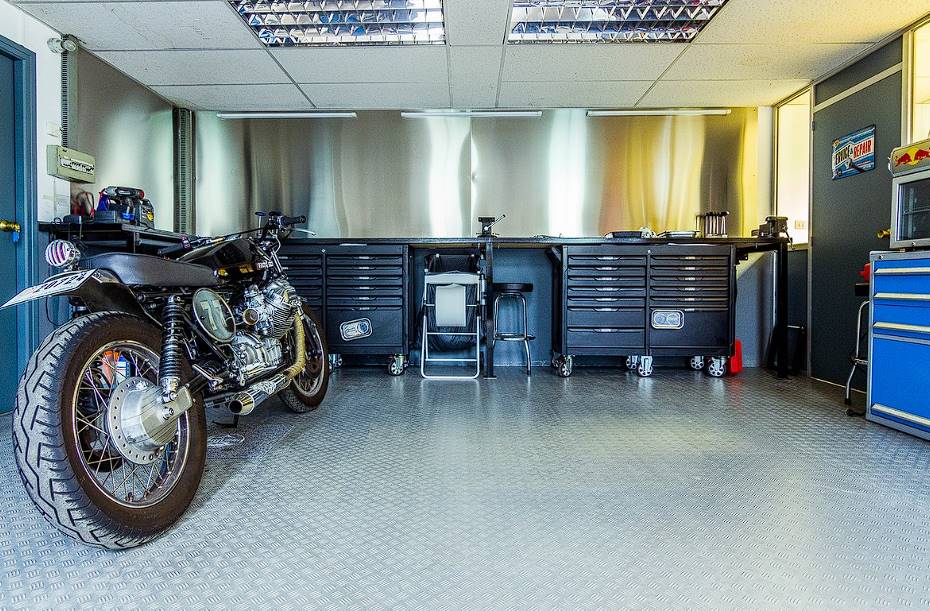
Garage floors face a multitude of challenges. They endure the effects of oils, chemicals, spills, and constant scraping, all while accommodating larger and larger vehicles. You need a garage floor surface that can withstand anything thrown at it while maintaining an impressive appearance.
Proper garage floor preparation is of utmost importance and should be considered. Most contractors agree that preparing the concrete floor constitutes at least 80% of the battle.
While epoxy garage coatings have demonstrated their durability when applied correctly, their effectiveness hinges on their ability to adhere and form a chemical bond with the concrete. However, this can only occur when the concrete is adequately prepared.
The process of preparing the floor depends on its current condition. Some floors may already have previous installations that need to be removed before grinding the concrete surface, ensuring it is ready to receive the new epoxy coating.
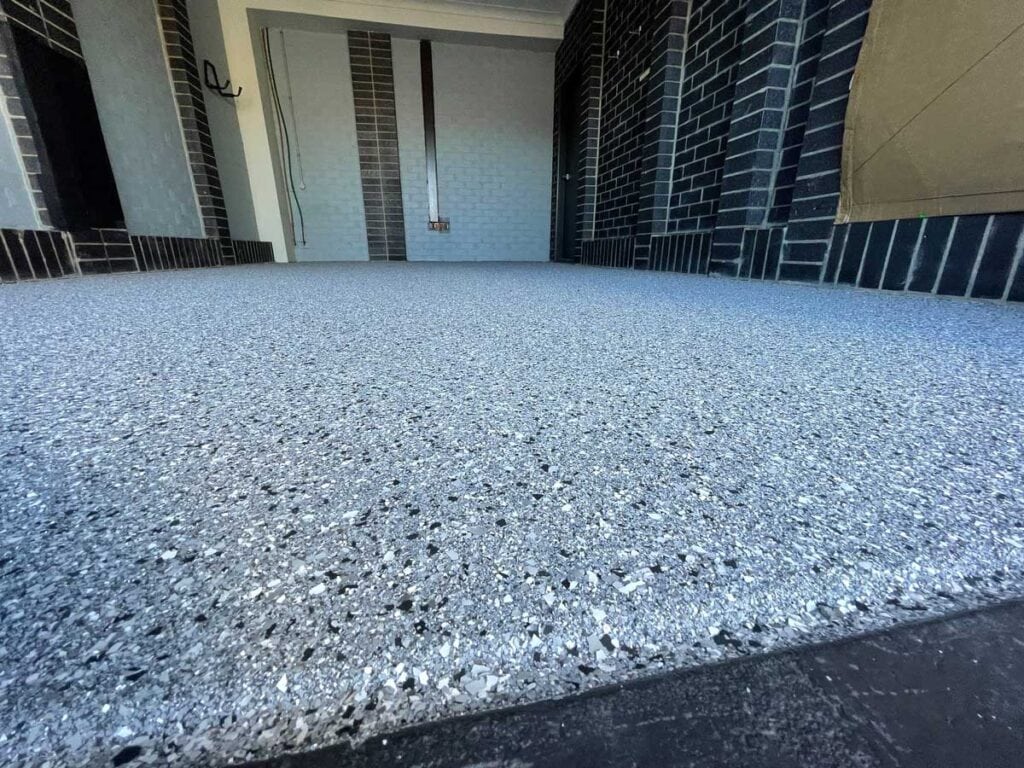
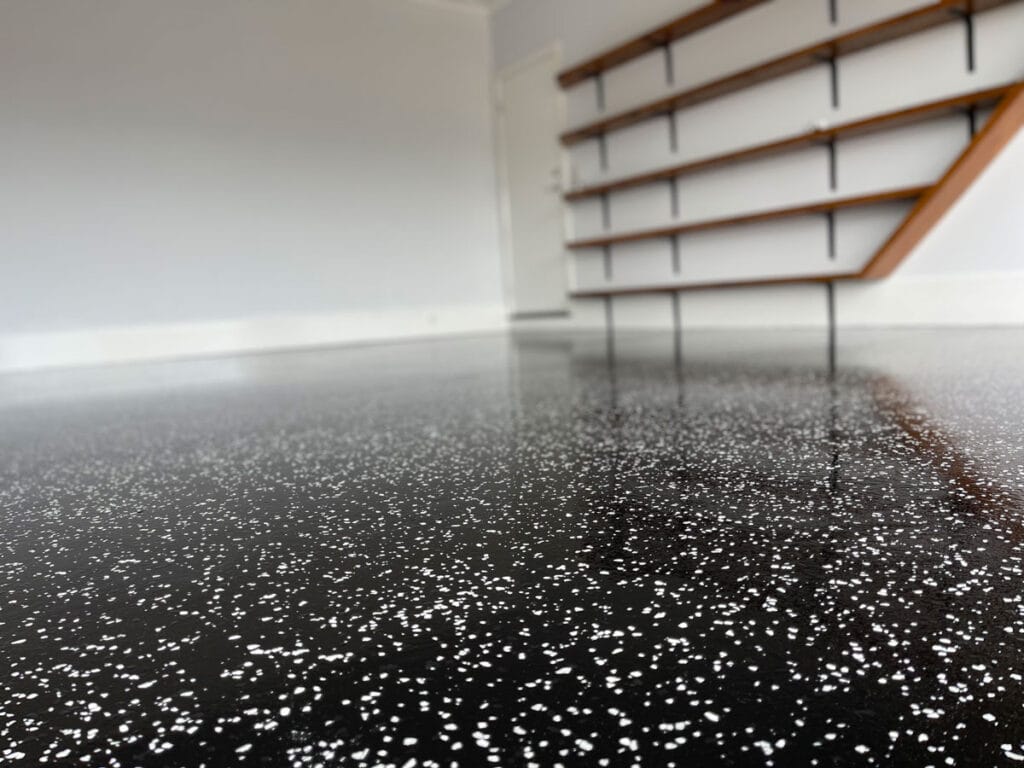
An epoxy garage floor presents an ideal solution. It not only offers an appealing and professional appearance but also provides long-lasting protection. Once exclusive to commercial establishments, the glossy finishes are now within your reach. By following a straightforward guide and employing basic skills, you can install an epoxy floor in your garage that not only evokes a sense of awe but also extends the lifespan of your floor while making it easier to maintain and clean.
How to Get a Garage Floor Ready for Epoxy
You must have chosen epoxy after a long search and comparison of the different garage flooring choices. That's a great choice, since concrete is durable and can make dull grey floors look nice.
Epoxy is great for garage floors because it makes it so people don't have to worry about fixing their floors every two years. Still, 80% of the job is preparing the concrete for the chemical application of the epoxy. This must be done by a professional with the right industrial grinding tools and requires 80% of the time. This method has a direct effect on how well the epoxy is installed.

Safety Tips
To ensure safety during this project, it is crucial to adhere to essential guidelines, especially when handling hydrochloric acid and epoxy. Always remember to wear the necessary personal protective equipment (PPE) and strictly avoid smoking while working on the project. Before beginning, it is recommended to turn off the gas supply to water heaters or any other appliances in the garage. Maintaining proper ventilation in the garage during the epoxy application is vital. Additionally, take necessary precautions to keep children and pets away from the garage and driveway while working on the project. By following these safety measures, you can carry out the task securely.
Remove Items and Fixtures
Removing items and fixtures is a critical and evident step that must be prioritized in every flooring project. It is essential to clear the garage floor surface by taking out all objects and belongings. Additionally, any items on shelves should be removed from the garage or securely wrapped and taped. Despite the grinding process being relatively dustless, ensuring that no valuable items are left in the immediate area is essential. Following this precaution can prevent any potential damage or disruption to your belongings during the flooring project.
Handy Hints
For achieving a flawless coating, it is recommended to use high-quality, lint-free rollers. Having an extra roller on hand is also advisable as a precautionary measure. When storing epoxy materials, it is best to keep them in an excellent area for at least 24 hours before mixing. Cooler epoxy temperatures can extend the working time.
Additionally, it is essential to check for moisture in the concrete surface. This can be done by securely taping a heavy-duty garbage bag over the centre of the floor. After 24 hours, lift one corner of the bag to check for any moisture underneath. If moisture is present, the epoxy will not adhere properly, and professional assistance or a new flooring solution may be necessary.
Control Joints
Particular attention should be given to control joints that were created during the installation of the original concrete floor. These control joints need to be thoroughly cleaned to remove dirt or debris, and chipped edges should be patched using a crack filler. It is essential to grind the repaired edges straight and in line with the control joint using an angle grinder to ensure uniformity in joint width.
During the epoxy floor installation process, it is possible for the base-coat epoxy, colour flake chips, and clear coating to flow over the edges of the control joint and even into the bottom of the joint. The neatness of this process depends on the specific joint and the installer's skills.
Once the flakes have been broadcasted and have cured, it is necessary to clean the control joint and remove any excess flakes that have overlapped. A floor scraper or putty knife can be used to carefully cut into the joint and cleanly remove flakes that are covering the joint. Once all excess flakes have been removed, the final top coat of the garage flake floor can be applied.
Clear Out the Garage
Regardless of the chosen flooring option, ensuring that your garage floor is completely clear of any dust and debris is crucial. This means that there should be absolutely nothing on the floor, no matter how small or insignificant it may seem. Removing all items, such as bikes, and thoroughly cleaning the floor to achieve the best results for your garage flooring project. By starting with a clean and debris-free surface, you can ensure proper adhesion and a successful installation.
Etch or Grind the Concrete
Acid etching is a method used to remove the top layer of a concrete floor, creating a more porous surface that facilitates the application of epoxy. It is essential to ensure that the surface is level and flat before proceeding with this step to prevent the chemicals from spreading beyond the intended area. To protect yourself from the chemicals, it is essential to wear safety goggles, rubber boots, and rubber gloves. Apply the acid and use a bristle brush to scrub small sections at a time.
After completing the etching process, thoroughly rinse the area to remove all traces of the chemicals. It is crucial to eliminate any acid remnants to avoid potential issues. Allow the area to dry for at least three hours before proceeding with the next steps.
Check Your Concrete Is Sealed
You can perform a simple water test to determine if a sealer has been applied to the concrete surface before applying an epoxy coat. Sprinkle a small amount of water onto the concrete and observe its behaviour. If the water beads up and does not absorb into the concrete, it indicates that a sealer has been used and must be removed before proceeding with the epoxy application. On the other hand, if the concrete readily absorbs the water and does not bead up, it suggests that the surface is unsealed and ready for the epoxy coating. This test helps ensure proper adhesion and a successful outcome for your project.
Protect the Walls
To protect your walls during the epoxy application process, it is recommended to tape plastic sheeting all around them. Make sure to leave tape at the bottom to prevent the epoxy from bonding with the sheeting. It's important to remember that the protective material should be removed once the floors are dry to avoid any unwanted adhesion.
Removing the baseboards from the walls can provide better access and space for applying the epoxy close to the walls. This helps to avoid cutting the edges with a brush and ensures a smoother application. Taking these precautions is standard practice at the beginning of any flooring project to ensure the best possible results.
Pressure Clean the Garage Floor
To thoroughly clean your garage floor, including the corners, it is recommended to use a high-pressure cleaner. Ensure that you wear protective shoes during the cleaning process. A high-pressure petrol cleaner is preferred to prevent the accumulation of petrol fumes, but it should be kept outside during operation.
After cleaning, use a stiff-bristled brush to sweep away any excess water and debris, ensuring the floor is dry and free from any remaining dirt. This step helps prepare the surface for the subsequent flooring application.
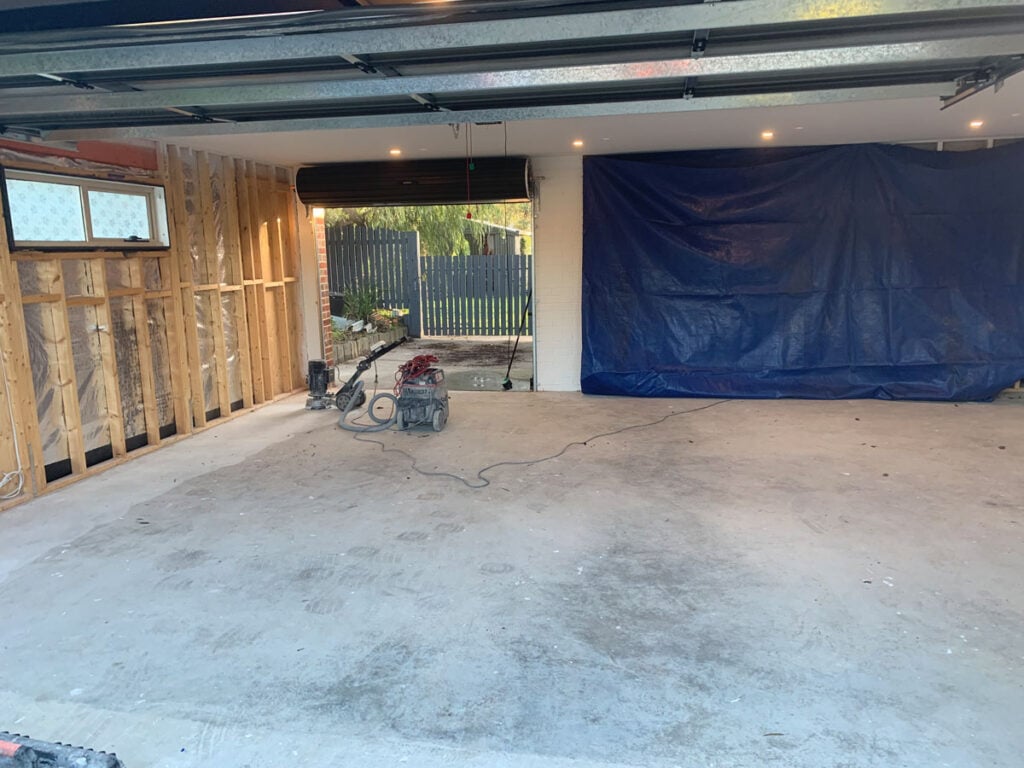
Grinding
The floor can be effectively prepared for a seamless epoxy installation by grinding it first. Either an industrial or a hand grinder, as well as a diamond grinding block or disc, will do the trick here. The ideal surface profile for epoxy application can be achieved with careful execution of the grinding process.
A vacuum system should be used during the grinding process to keep the area clean and contain any concrete dust that may be released. Since the vacuum system efficiently traps dust, there's no need to take down anything from the walls or ceiling. Having it this way makes preparing the floor quickly and easily.
Garage Door Round Over
Addressing the round over where the garage floor meets the driveway is essential before applying the epoxy. This area should be ground and cleaned up to ensure proper adhesion of the epoxy. To protect the driveway concrete from any accidental epoxy application, you can use painter's tape to mask off the area.
By masking off the driveway with painter's tape, you can create a clean and defined edge for the epoxy application. This helps prevent any unintentional spreading of epoxy onto the driveway surface and ensures a neat and professional finish.
Mud Jack the Area
Repairing the concrete floor's imperfections, such as cracks, is essential before applying epoxy. If the ground is uneven, you may need to use mud or slab jacking. Cement slurry is injected through holes drilled into the concrete slab to lift and level the surface.
Allowing the cement slurry to cure for at least 28 days is necessary after mud jacking. After this time has passed, the surface will be sufficiently cured and levelled for the epoxy coating to be applied.
The concrete should be repaired by filling any holes and smoothing out any bumps. As a result, the epoxy can be installed more smoothly and uniformly, leading to a better aesthetic.
How to Prepare Your Garage Floor for Epoxy
This solution is suitable for DIY enthusiasts who want to achieve a good-looking floor on their own. Following the preparation method suggested by Rust-Oleum is a viable option for achieving a satisfactory result. However, it's important to note that professional flooring experts may have different approaches and methods for preparing concrete floors for epoxy.
You can opt for the etching method if you prefer not to use a hand grinder with a diamond blade to grind the concrete. Etching opens up the surface of the concrete, making it more porous and allowing the epoxy to adhere effectively. While it may not provide the same level of concrete removal as diamond grinding, it can still create a suitable surface for epoxy application.
Ultimately, the choice between grinding and etching depends on your comfort level and the desired outcome. Diamond grinding is recommended if you want a professional-quality finish and have the necessary tools and skills. However, if you prefer a more straightforward approach and are satisfied with a slightly less aggressive preparation method, etching can still produce a satisfactory result.
For Painted Floors
To prepare a painted garage floor for epoxy coating, it's essential to de-gloss the surface to ensure proper adhesion. One way to accomplish this is by using a sanding pad. Ideally, you would use a power tool equipped with a sanding pad, as it will make the process faster and require less manual effort.
- To get rid of dust, sweep the floor.
- Use a brush, broom and a floor cleaner to clean the floor.
- Rinse the floor well, and let it dry for at least three hours.
For all other bare concrete
- Your garage floor is now ready. Sweep the whole floor, and use a vacuum to eliminate as much dust as possible. Use an old paintbrush to get into hard-to-reach places and along the edges.
- Mix water and etching solution in a watering can and then pour it on the floor to etch it.
- Wet the floor with water and pour the etching solution in a 10-by-10-foot spot farthest from the leading garage door.
- Scrub the floor with the etching solution using a bristle brush.
- Continue etching the floor until the whole thing is done.
After thoroughly preparing and drying the floor, it's time to mix the epoxy coating. Follow the instructions provided with the two-part epoxy solution carefully. Begin by applying the solution along the edges using a brush, then continue to coat the remaining floor area using a roller brush.
Once the coating is applied, allow it to dry for up to 24 hours. It's essential to ensure that the floor is undisturbed during this time for proper curing.
Conclusion
The most important details in this text are the steps needed to prepare a garage floor for epoxy coating. This includes preparing the concrete for the chemical application of the epoxy, which must be done by a professional with the right industrial grinding tools and requires 80% of the time. Safety tips include wearing the necessary personal protective equipment (PPE) and avoiding smoking while working on the project. Before beginning, it is recommended to turn off the gas supply to water heaters or any other appliances in the garage. The most important details in this text are the safety measures to take when applying epoxy to a garage floor.
These include removing items and fixtures, using high-quality, lint-free rollers, storing epoxy materials in an excellent area for at least 24 hours before mixing, checking for moisture in the concrete surface, cleaning control joints, and grinding repaired edges straight and in line with the control joint. Additionally, it is important to check for moisture in the concrete surface by securely taping a heavy-duty garbage bag over the centre of the floor. A floor scraper or putty knife can be used to carefully cut into the joint and remove flakes that are covering the joint. Clearing out the garage is essential to ensure proper adhesion and a successful installation. Acid etching is a method used to remove the top layer of a concrete floor, creating a more porous surface that facilitates the application of epoxy.
To protect the walls during the epoxy application process, it is recommended to tape plastic sheeting all around them. A water test can be performed to determine if a sealer has been applied to the concrete surface before applying an epoxy coat. The most important details are to remove the baseboards from the walls, pressure clean the garage floor, grind the floor, address the round over where the garage floor meets the driveway, use painter's tape to mask off the driveway, and mud jack the area before applying epoxy. These steps are essential to ensure the best possible results and ensure the best possible results. Mud or slab jacking is used to lift and level the concrete slab.
After 28 days, the surface should be sufficiently cured and levelled for the epoxy coating to be applied. DIY enthusiasts can use the Rust-Oleum recommended preparation method, but professional flooring experts may have different approaches and methods. Etching is a more porous option, but it may not provide the same level of concrete removal as diamond grinding. Diamond grinding is recommended for a professional-quality finish. The most important details are that for painted floors, it is essential to de-gloss the surface with a sanding pad, sweep the floor with a brush, broom and floor cleaner, rinse the floor well, and let it dry for at least three hours. For bare concrete, it is necessary to etch the floor with an old paintbrush, mix water and etching solution in a watering can, scrub the floor with a bristle brush, apply the epoxy coating, and allow it to dry for up to 24 hours.
Content Summary
- Proper garage floor preparation is crucial for epoxy application.
- Preparing the concrete floor constitutes at least 80% of the battle.
- Epoxy garage floor offers long-lasting protection and an impressive appearance.
- Removing previous installations is necessary before grinding the concrete surface.
- Safety measures should be followed when handling hydrochloric acid and epoxy.
- Clear the garage floor surface by removing all objects and belongings.
- Use high-quality, lint-free rollers for a flawless epoxy coating.
- Check for moisture in the concrete surface before applying epoxy.
- Pay attention to cleaning control joints and patching chipped edges.
- Protect walls with plastic sheeting during epoxy application.
- Perform a water test to determine if a sealer has been applied to the concrete.
- Prepare the floor by acid etching or grinding.
- Use a vacuum system during grinding to contain concrete dust.
- Address the round over where the garage floor meets the driveway.
- Repair concrete floor imperfections before applying epoxy.
- Mud or slab jacking can be used to level uneven surfaces.
- Fill holes and smooth out bumps on the concrete before epoxy application.
- Follow a preparation method suggested by Rust-Oleum for DIY enthusiasts.
- Etching can be an alternative to grinding for creating a porous surface.
- De-gloss a painted garage floor before applying epoxy.
- Sweep and clean the floor before etching or grinding.
- Mix water and etching solution to etch the floor.
- Apply the epoxy coating along the edges using a brush.
- Use a roller brush to coat the remaining floor area with epoxy.
- Allow the epoxy coating to dry undisturbed for up to 24 hours.
- Thoroughly rinse the area after acid etching to remove chemicals.
- Protect children and pets by keeping them away from the project area.
- Proper ventilation is important during epoxy application in the garage.
- Remove all dust and debris from the garage floor before installation.
- Follow manufacturer's instructions carefully when mixing and applying epoxy coating.
Frequently Asked Questions
Concrete flooring primers create the best foundation for bonding your epoxy base coat. Epoxies are designed to cure and harden.
Grinding a garage floor before applying an epoxy coating or paint can help to ensure a smooth, durable finish. It's essential to properly prepare the concrete surface before beginning the grinding process. This will make the epoxy coating or paint adhere properly and last for years.
The coating can't correctly adhere to concrete floors if something obstructs their application. Grease and oil on your floor will also cause the resin to set improperly, which leads to peeling. Have opened pores: If a surface is too smooth, epoxy can't adhere to it.
The concrete will immediately, or at least within a minute, darken as the water absorbs in areas with no contaminants. You would immediately notice whitening or a frosty hue in areas that have silicone-type contaminates. Further, check to see if the water beads up and then takes more than a couple of minutes to absorb.
Even though epoxy floors are highly durable, they can get damaged by grease, oil or water. The damage won't happen immediately, but you should still clean the mess before you forget. If left for too long, even water can degrade your epoxy floor.