Do you want to learn how to make incredible works of art using epoxy resin? Wow, that's awesome! Then you should definitely read this blog post. Because you are just starting out, we want to make sure that your beginning in the world of resin is done properly. This means that you will be learning the basics of epoxy resin art, such as what it is, the supplies that you will need to deal with it, the surfaces that it can be used on, and many more.
Furthermore, you will receive an in-depth guide that will walk you through the process of making your first piece of artwork with epoxy resin. Therefore, embark on this adventure with us, and along the way, you will learn to appreciate the art in the same way that we do.
Art has always been a medium through which we may communicate our feelings, wishes, and more intangible ideas that words are unable to adequately convey.
Firstly, painting and sculpture were considered to be the pinnacle of artistic expression. Every other media, on the other hand, was considered to be an amateur's attempt to imitate the work of established artists.
These days, we don't bother with such pretensions; instead, we get mixed-media art and installations that occasionally make use of elements that would never be seen again in any other venue. Resin is a media that has gained popularity practically overnight, and its applications appear to be restricted only by the user's imagination; but, what exactly is resin? What specific things are you able to create with it? Let's look into it, shall we?
What is Epoxy Resin Art?
Creating works of art out of epoxy resin involves the employment of polyepoxides in some capacity. This fashion movement was first observed in the United States, Europe, Canada, and Australia. It enables artists to create works of art that are on par with them in terms of their brilliance, luminosity, and clarity.
Creating works of art with resin might involve designing paintings, making resin coasters, and working with a variety of casting mediums. Resin casting refers to the process of making a variety of objects out of resin using casting techniques. In addition to allowing you to create traditional castings, it also gives you the ability to embed anything in your creations. This can include things like stones, glitter, and other naturally occurring elements, among other things. Finally, you'll have unique, stunning art objects.
To begin creating works of art using resin, you must first combine the two components (resin & hardener). This sets off a chemical reaction that, once it has hardened, generates a surface that is elevated and transparent. The curved surface can then be sanded, polished, or even painted once the curve has been formed. Crafters appreciate working with resin because it provides a high level of finish to the artwork they create with it. In addition to that, it imparts colors that highlight the artwork, make the pieces shimmer, and makes them more long-lasting.
In addition to this, it has a greater thickness than other finishing products such as varnish. Because of this, it is able to shield your art objects from harmful factors such as elements and chemicals. Epoxy coating not only prevents scratches but also helps surfaces retain their original appearance. Even better, it's a versatile material that enables a wide variety of design options to be explored. Because of this, you may apply it on a variety of surfaces to give your pieces more of a standout appearance.
The United States, Canada, Australia, and Europe are the originators of the trend of using resin in artistic creations (the technology is still little known here). Resin is a medium that can be used to produce works of art that mesmerize on account of their transparency, luminosity, brilliance, and depth.
The term "resin art" refers to the creative practice of making items of art out of epoxy resin. This term refers to all of the different aspects that comprise this art. Paintings, varnishes, resin jewelry, Petri dishes, and a wide variety of other casts of any kind can all be created with resin. Resin can also be used to design paintings. This latter process is also referred to as Resin Casting.
In addition to the more traditional transparent castings, you can also put a wide variety of objects in your cast. Some examples of these include natural materials, stones, glitter, and many other things. The imaginative capacities of the artist are unrestricted. The end result is a collection of stunning works of art, each of which is as singular and distinctive as the artist who created them.
Who Loves Resin Art?
Performers are at the top of the rankings; the classic artist particularly enjoys the way in which the epoxy resin can be applied in a thin, clean coating to coat the artwork, giving it a gloss and bringing the colors to life while also providing security for a lifetime. In addition to that, it also involves bringing their artistic and creative processes into the present day in a way that really inspires them.
There are additional people on this list who adore the natural world. It is common for artists to claim that a piece of art conveys a message to them from nature.
Quick question: Have you ever looked at a piece of resin art, particularly one that was created using the swirl pour technique, and it gave you the impression that it was a view of the ocean, the world as seen from space, or that it simply seemed natural? It's also been suggested that working with resin might help you find emotional equilibrium by connecting you to the natural materials of the earth.
As art resin is increasingly employed in educational settings, it is logical to assume that many people who enjoy using it are also students or teachers.
Educational psychology has shown that lessons are most effectively learned when they are taught to children at a younger age, between the ages of three and nine, and that after that age, it is ideal for children to learn new artistic techniques. Students who master the skill of resin epoxy are likely to carry this knowledge with them throughout their lives.
Resin enthusiasts can be grouped together into one category; they are those who enjoy working with resin and the finished products it produces. Art enthusiasts also have a strong interest in attempting new things with photographs, paintings, countertops, flooring, and other aspects of interior design.
Which Surfaces Are Suitable For Epoxy Resin Art?
The development of resin art can be done on a number of the materials that you are familiar with. Surfaces such as glass wood, concrete, metal, plexiglass, and hard paper that does not absorb liquid are examples of these. Consequently, some of the things that you may try your hand at manufacturing using epoxy resin include furniture, wooden floors and pottery, walls, tiles, and other materials that are similar.
Epoxy resin art can't be done on absorbent or porous items since the epoxy resin would seep through them rather than stay on the surface where it was applied. For this reason, things like clothes, regular paper, and similar items cannot be used, with the possible exception of a few exceptional circumstances in which they can be used in numerous layers.
What Can Be Made with Resin Art?
It would be quite meaningless for us to tell you that there are a lot of things you can make if we didn't provide you with any samples, so here are some examples of epoxy art creations that you can produce. As we mentioned earlier, there are a variety of things you can do when it comes to resin artwork. It's possible that resin art is an easy medium to begin working with, but if you're just getting started, it's best to take things slowly and work up to larger projects gradually. This will help you avoid taking on more than you're capable of handling.
Resin Coasters
To begin, there is the time-honored practice of creating coasters using resin as the medium. This is a terrific all-rounder that provides pros with countless opportunities, and it is a good starting point for those who are just getting started. Coasters are easy to make, serve their purpose well, and allow for a great deal of personalization in terms of their appearance.
There is an abundance of readily available molds for making resin coasters, and they are one of the most efficient kinds of resin art because no further work is required. Instead, you should pour the resin into the molds and then wait the amount of time that was advised by the manufacturer for it to set and cure.
Wood Wall Art
Creating this piece of resin art may not be the simplest, but it certainly is one of the most beautiful. The term "resin wall art" refers to any piece of resin artwork that may be hung on a wall, regardless of whether it is a mixed-media piece or a straightforward flat casting. As is the case with the majority of forms of resin art, the options are virtually limitless. The end product is a stunning amalgamation of the two materials, wood, and resin, which is not only completely unique but also guaranteed to endure a lifetime. You are welcome to add color, images, magnets, and anything else you may think of that could increase the value of the component of wood wall resin art you have created, so please do so.
Resin Geode Art
The next topic on the agenda is geodes. In middle school, we were all taught about geodes, but just in case you've forgotten, geodes are naturally occurring small rock sculptures that display gorgeous colors and jagged designs. Geodes can be found all over the world. There are a lot of people that collect them all around the world, but due to the fact that they are quite hard to find in some areas, you can manufacture your own with some epoxy glue.
You will need to start by obtaining a geode-shaped resin mold, then mixing your resin, pouring it into the mold, and allowing it to cure.
If you bust open your mold, you'll find that you have your very own geode! If you want to give your project a more interesting appearance, you may spice it up by adding bits of rock, sparkle, or even various colored resin.
Poured Gold Leaf Canvas Resin Art
After it has been hung up in your living room or gallery, wall art made of wood might be the most attractive option; nevertheless, wall art made of leaves and resin on canvas is likely to be the most entertaining and thought-provoking option.
You will require a canvas, some acrylic paint some gold leaf, and of course, some clear pour epoxy resin in order to complete this project.
To begin, lay your canvas on an elevated workplace that is covered (remember, you should always cover your workspace!). as well as combine the resin with the hardener. After that, pour some of the resin into little containers that are about the size of large shot glasses.
Epoxy Resin Cutting Boards
Imagine for a moment that, while perusing some very incredible works of art on Instagram or Pinterest, you found yourself wondering how to create works of art with resin. If this is the case, then you may relax knowing that not all pieces of resin art are overly difficult like the turtle that we discussed earlier in the sentence.
There are some resin works of art that are easy to create and even useful in everyday life. Making resin cutting boards is a simple method that only requires a cutting board in the shape of your choice, some epoxy, acrylic, and painter's tape.
Tape off the area of the cutting board that will not be coated with resin. This will prevent the resin from leaking into the next section of the board and will also ensure that no spatter will land on the area of the board that has not been coated.
You could cover the entire board in resin, but in our opinion, a combination of resin and wood looks much more interesting. After you have finished taping up your board, you should first combine your resin and hardener in a single container before separating it into several smaller containers.
Next, add paint hues to your smaller containers. In most cases, a single globule will suffice and then mix the ingredients together. Now, spread a tarp out on the floor and put a bucket there that you won't need in the foreseeable future. Place the section of the cutting board that will be coated over the edge of your work table, and then pour the resin and paint from the individual containers onto the surface of the board in the appropriate places.
Once one side of the board has hardened, flip it over and repeat the steps until you are satisfied with the colors, swirls, and covering. You can use a paintbrush to spread over any places that haven't received enough resin, and once one side has hardened, flip it over again. As soon as you are pleased, wait for the amount of time that the manufacturer recommends for the resin to cure.
After curing, the resin is totally safe to use around food, therefore the piece of art you create with it will be completely functional.
3D Box Resin Art
This one is not for those who have weak stomachs. The illusion of depth is created in 3D resin art in the same manner that a 3D printer would, but the cost is only one-third of what a 3D printer would charge. In theory, it shouldn't be too difficult; all you actually need is a little wooden box, some acrylic paint, half of an eggshell, some art supplies, a heat gun, and some resin. To begin, establish a foundation for your turtle by pouring some resin into the box, then allowing it to harden completely.
After waiting for the resin to harden, set one of the egg halves on top of the hardened resin, and then use some paint to draw the outline of a turtle on it. Once you have completed the outlining of your turtle, you may then remove the eggshell and begin painting the turtle's "feet" and little legs around the outside of the eggshell. You may construct the texture of a turtle's skin by alternating between green and yellow, and you can add whatever details you feel are required as well.
Remove the rough edges from the eggshell that you filled with resin earlier using a blade or some fine grit sandpaper. Now that you have your depth, you may remove the rough edges from the eggshell. Pour another thin layer of resin over the shell and allow the excess resin to flow off into the box before you pop your shell into position. Add an additional thin layer of resin to the box after you've popped your shell into the set, and then set it in place.
Next, using some yellow paint, paint the shell and add some depth to it. Then, using yellow paint, create an outline around the shell that should (somewhat) cover the limbs that you painted previously. Finally, if you want to give your turtle's head a little more dimension, you may give it some extra depth by placing something of the same size in that region, painting it, and then adding any other finishing touches you like.
Epoxy Resin Keychain
Keychains made of epoxy resin are one of the most popular and adaptable types of epoxy resin artwork now available (besides coasters). Not only are they simple to make, but they also make an excellent small present that can be given at pretty much any time of the year.
To make a good work of art out of a keychain, you basically don't even need a mold that is designed specifically for keychains. Instead, you may use any sizeable resin casting and attach a keychain to the mold prior to the epoxy's complete curing time.
You could do this in one of two ways: first, you could buy a keychain mold, which comes in a wide variety of interesting shapes and sizes; second, you could take any resin casting and drill a hole in it. Both of these options are available to you.
Your resin casting can be altered either before or after it is properly set and cured; if you are going to do it before, your resin could benefit from the addition of some paint, resin color, glitz, or even pictures. If you are going to do it after it has been completely set and cured, you can add some glitter. Sanding, drilling, etching, or engraving your workpiece to the design of your choice are all options available to you if you decide to carry them out.
Making The Correct Choice For The Project
When it comes to choosing the right epoxy resin for your project, there are a few aspects you need to take into consideration that is specific to the project that you are currently working on. The following are several resins, along with the applications that work best with them.
High Viscosity
This category of resin, which is sometimes referred to as countertop resin or laminate resin, is designed to be used for covering surfaces. In spite of the fact that we recommend that customers adhere closely to resins that have a high viscosity, we continue to recommend that customers follow the instructions provided by the product's manufacturer regardless of the product's viscosity (laminating resins, epoxy resin, and countertop resins).
Low Viscosity
This class of resin, which is also known as epoxy resin for casting resin, makes it possible to achieve sufficient wetness. Although products in this category are long-lasting and strong, the curing process can take anywhere from twelve to twenty-four hours. These are typically utilized for attaching materials such as steel to concrete, plastic to concrete, and wood to concrete, to mention a few examples. They have a low level of odor and do not include any solvents.
Epoxy resins with a low viscosity have a number of benefits, including the following:
- Superb filler
- Fantastic for fostering relationships
- Excellent in wet places
- Excellent interior surfaces overlay
- Both indoor and outdoor crack sealants.
Which Brand Of Epoxy Resin Is Best For Art?
Working with resin is great if you enjoy trying new things.
In addition, the resin can be used to give drawings, photographs, and paintings (produced using oil, acrylic, alcohol ink, watercolor, ink, or mixed media, for example) a shiny finish and shield them from Ultraviolet light and mechanical impacts.
Epoxy can be used to produce geode art, an epoxy river table, and wood. To help you choose wisely, we will go through a few of the various epoxy resin brand names here.
Riverdale:
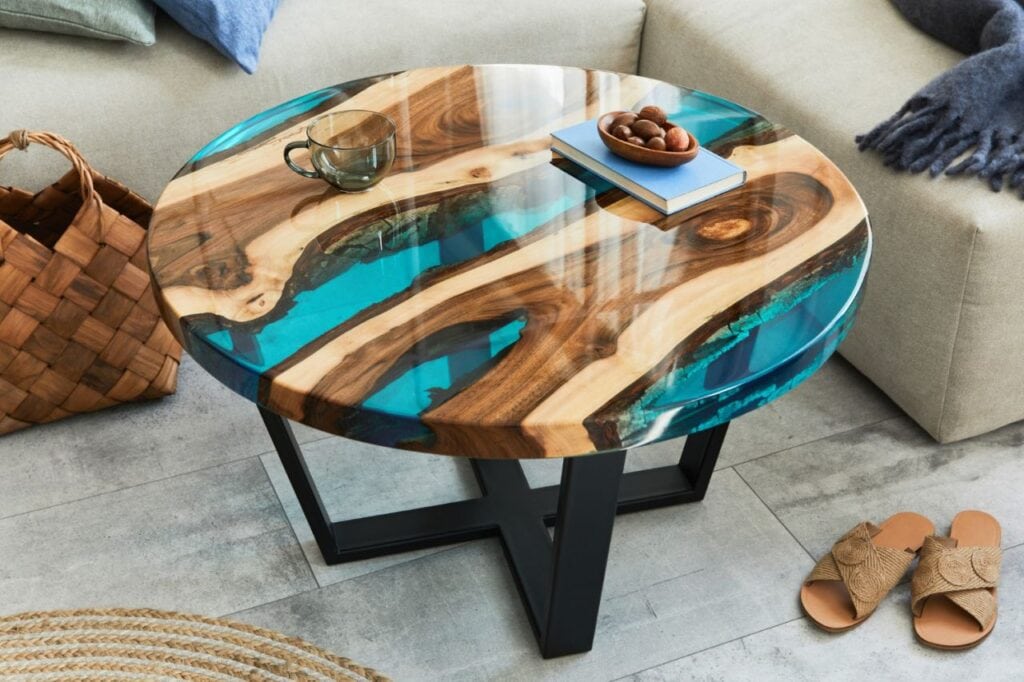
The epoxy resin design for your table is not only exquisite but is also quickly overtaking other materials in terms of production volume. Despite the fact that this product is made in all possible permutations, we still need to consider how the product is prepared: table size against mixed quantity.
EcoPoxy FlowCast is the epoxy resin of choice for this task, and it is especially suited for counters, tables, and woodworking. Another brand that is appropriate in the above-mentioned industry is FGCI Liquid Glass Casting Resin.
Art And Craft:
There are specialized goods for each resin fabrication in the area. As a result, it must be flexible. For the glue that will be utilized in this field, which has a high viscosity, color separation is a significant issue.
We also want to prevent yellowing so that the colors in your artwork are completely transparent. ArtResin and Dr. Crafty brands of resin are suggested for the field. Both resin varieties are offered by a number of internet retailers, including Amazon.
Jewelry:
Molds made of silicone or epoxy resin work well for casting exquisite jewels. To prevent the resin from fading the way jewelry does, we must take certain precautions. In addition, we wish to guarantee that this resin brand is very compatible with different materials, like wood, metal, and others.
It's important to keep in mind that this resin needs to be sufficiently tough after curing to prevent scratches. Due to the fact that this form of art is most comparable to art and craft, ArtResin and Dr. Crafty are also advised.
UV:
Molds made of silicone or epoxy resin work well for casting exquisite jewels. To prevent the resin from fading the way jewelry does, we must take certain precautions. In addition, we wish to guarantee that this resin brand is very compatible with different materials, like wood, metal, and others.
It's important to keep in mind that this resin needs to be sufficiently tough after curing to prevent scratches. Due to the fact that this form of art is most comparable to art and craft, ArtResin and Dr. Crafty are also advised.
Casting:
The specifications for casting are a little different because every other resin is based on flat surfaces.
Given that casting layers are frequently higher, the resin must not firm or cure rapidly in order to prevent excessive warmth; excessive heating is bad because the curing will persist before the bubbles are eliminated.
Casting resin often has a low viscosity, making it thin. The six-centimeter (6cm) thickness and the prolonged time should prevent quick heating and provide development timing during the canning process.
Resin Art Supplies
In the field of art, epoxy resin is almost never employed by itself. It allows for color blending. Additionally, you may combine it to create original works of art with glitter, corals, décor stones, beads, crystals dried leaves, and other materials. Additionally, it can be poured into various things to take on a variety of shapes.
Along with your epoxy resin, you might also need some of the standard items listed below. Of course, you'd need additional tools or supplies depending on the project you're working on. You may also look at this in-depth fluid-painting.com instruction for epoxy and wood to make amazing furniture built with epoxy resin.
- Epoxy Resin Pigment: You'll need to have epoxy resin pigment or special paint on hand if you want to add some color to your works.
- You'll need bowls or cups to mix your epoxy resin with the other crafting supplies. To mix and measure your combination, you need to have at least two different bowls available. Use disposable containers if you have them. Because earlier mixtures won't be able to contaminate your fresh combination, they're thought to be the greatest choice for the majority of jobs (so, your new creation would be free from the residue that comes from your past creation).
- Wooden Sticks: To create the ideal design you want, you'll need wooden sticks to stir your epoxy resin mixture.
- Protection Gloves: It only makes sense to safeguard your hands while making your art as you'll be working with chemicals. To protect your hands, it would be great if you purchased a few pairs of latex gloves.
Conclusion
Due to its wide range, utilizing epoxy resin to make art requires a lot of understanding, but as you produce more and learn more, you'll get the hang of it. You'll soon be producing outstanding epoxy resin artwork.
You should be prepared for the fact that employing epoxy glue for art is a sticky business. Making homemade resin art can be fulfilling as long as you follow precautions.
While this step is advantageous to the artist and the art owner, the process requires time, patience, and education on using tools/materials and conducting each step. Coating your art with resin preserves the materials and provides protection from your everyday wear, tear, and scratches. For your paint pieces, it provides not only protection but adds gloss to the piece, which usually brightens the colour and sheen, causing the piece to stand out.
Epoxy colouring pigments are a safe way to colour resin. If you use high-quality BALTIC DAY pigments, you only need a very small amount to colour your resin. Colouring dyes in powder form do not dissolve completely, resulting in a beautiful, optical effect. Pure epoxy is usually transparent, clear, and colourless. However, you can colour it with various types of pigments. Some of these colours are; airbrush colours, alcohol inks, and powdered colour pigments. Note, avoid water-based paints since they can prevent the polyepoxides from hardening fully.
Polyepoxide has high adhesives properties when it cures. For that reason, it’s quite difficult to remove it from surfaces by mechanical means. So, instead of scraping it off the surfaces, adopt other removal techniques. The most effective method of removing hardened epoxy is to use acetone. First, however, you need to ensure the space has adequate ventilation.
